

So it is no secret that I love baking. I’ve also always been a batter/dough freak; to me everything always tastes better before it goes in the oven.
That is sort of what drew me to the Levain Bakery cookies. You’ve probably seen pictures of their heavenly baked goods online seeing as the New York based bakery has taken the internet by storm. Their cookies have this delicious doughy inside, while being golden brown on the outside. Also, did I mention that their cookies are monsters? They are basically hockey pucks. You can check them out here.
I really wanted to see if I could recreate Levain’s masterpiece, while also seeing how much I could reduce the amount of sugar and butter in the recipe (because yikes). And guys, I think I’ve found found it. After taking tips and tricks from many different baking blogs and recipes, I believe I have created a masterpiece.
You can follow along with the recipe in the blue boxes and my extra commentary outside of that.


1/2 cup Butter
The first step of the recipe is browning the butter. Although it is by no means necessary, it really adds a delicious flavour to your cookies that I’ve become obsessed with. It is a pretty easy process, too! Here is the easiest way I do it…
- Cut your butter into cubes before dropping it into a small pot, preferably one with a light coloured bottom unlike mine.
- Continuously stir the butter while it is on medium heat (I keep my stove top at a 4) so that it is simmering.
- Keep it simmering for about 2 minutes, keeping a close eye on it so that it doesn’t burn. The smell of the butter changes as it browns and you’ll notice some sediment form on the bottom of you pan. THis signals that you’re butter is ready to be taken off the heat.
- Take the butter off the heat and tranfer it into a heat safe bowl. I continue to use this bowl throughout the rest of the recipe, so I make sure that it is big. Allow the butter to cool for a few minutes.
And voila, you have browned butter! It may not seem very special now, but just you wait…


1/2 cup Brown Sugar
1/3 Cup Granulated Sugar
Once your butter is cooled you can add in your sugars. This is where your kitchen will begin to smell like delicious caramel, basically because you have all of the ingredients for it right there in your bowl. This caramel-iness can actually be tasted in the cookies once they’re baked – delish!


2 Eggs
Once you’ve mixed the butter and sugars your bowl should look like the first picture above (it will still be grainy). Then you’re ready to add in your eggs. From this point on you want to try and keep your mixing to a minimum, only stirring until everything is just combined.


2 Cups Flour
3/4 tsp Baking Soda
3/4 tsp Cornstarch
The flour is always the finicky part of every cookie recipe. Sometimes the amount that the recipe calls for leaves your dough runny while others leave it as hard as a brick. The key is to add it in slowly and mix as you go.
I also know that cornstarch seems odd to add to a cookie, but it helps to make it thicker.


1 ½ cups Chocolate Chips
Once your dough comes together you can add in your chocolate chips. Honestly, I usually just add handfuls of the milk chocolate ones until it looks right. It you are really looking to replicate the Levain cookies, you can also add in some chopped walnuts here.

Now is when my brown butter obsession has it’s catch 22. Since we melted the butter, we’ll need to chill the dough for about an hour before baking. This will help the dough to come together and not flatten into crisps. Cover it with saran wrap and pop it in the fridge for anywhere upwards of an hour before moving onto the next step.
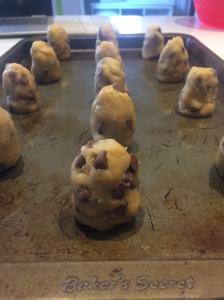
I can hear you gasping at those oddly shaped dough balls, but wait! I like to think that these are key to making sure your don’t end up with thin, crispy cookies. Roll the dough into large balls, then keep pressing at the middle as you roll to get the elongated shape. They should resemble the shape of a wine bottle cork. Once that is done, they are ready for the oven!
Bake at 410°F for 10 minutes.
After 10 minutes the cookie will still be soft to the touch, but the outside should be golden. This is because of the high temperature, which cooks the outside but leaves the inside delicious and gooey. My mouth is watering just at the thought.
Here is the result… 😍


Yummm! While you should probably wait for them to cool, who really has that kind of willpower? I like to press down on the cookies with the bottom of a measuring cup straight out of the oven to flatten out the tops if they are too round. I used to have this problem all the time where my cookies would bake but stay the same shape as the round dough balls they started as. If you have this problem too, try the measuring cup trick (they show it in more detail here). Other than that, they are pretty much ready to be devoured.
I really hope that you try these cookies out or even just learn a a new cookie trick. I have big plans to add new recipes to the blog in the future, especially since I am on a baking kick for now.
But for now, let this recipe rest my search the for the perfect chocolate chip cookie.
A la prochaine,
Iz
